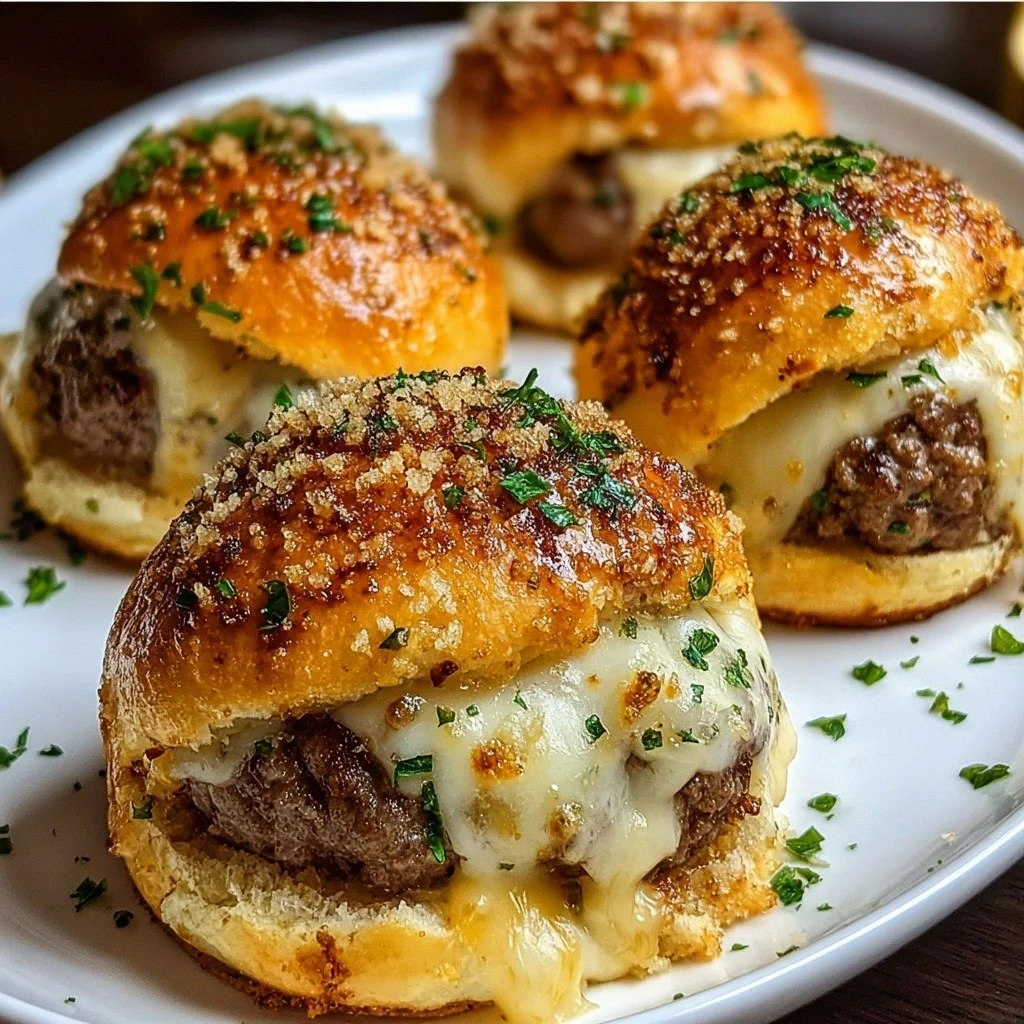
I was halfway through a midnight Netflix binge when my roommate shouted, “You have to try this!” I had just finished a half‑eaten pizza, the crust still warm, and my brain was screaming for something that could satisfy that greasy‑cheese craving without the guilt of ordering delivery. That’s when the idea for Garlic Parmesan Cheeseburger Bombs was born: a bite‑size, handheld explosion of burger goodness wrapped in a buttery roll, smothered in garlic‑infused Parmesan, and baked until the edges turn golden like a sunrise on a summer patio. I tossed a few ingredients together, and the kitchen instantly filled with a scent so intoxicating that even the cat paused his nap to stare at the oven. The first bite? It was like a classic cheeseburger had taken a vacation to Italy, then decided to crash a party in your mouth.
If you’ve ever tried to recreate that “burger‑and‑fries” feeling in a snack form, you know most recipes either end up dry, soggy, or just plain bland. Most of those attempts miss the mark because they either skip the butter‑soaked roll or they drown the meat in a sauce that never truly adheres. My version, however, treats each component like a star on a Broadway stage—each one gets its moment to shine, and together they deliver a performance that’s unforgettable. The secret? A simple garlic‑butter glaze that seeps into the roll, a generous dusting of Parmesan that crisps into a delicate crust, and a perfectly seasoned beef mixture that stays juicy even after baking.
You might be thinking, “Isn’t this just another copycat of the classic cheeseburger roll?” Nope. This is the version that makes the original look like a rehearsal. I dare you to taste this and not go back for seconds—because once you’ve experienced that buttery, garlicky crunch followed by a melt‑in‑your‑mouth cheese center, you’ll understand why I’m calling it the best snack you’ll ever make at home. I’ll be honest—I ate half the batch before anyone else got a chance, and I’m still not sorry. The reason is simple: this snack is engineered for maximum flavor impact with minimal effort, and the payoff is pure, unadulterated joy.
Okay, ready for the game‑changer? In the next sections I’ll walk you through every single step, from choosing the perfect roll to mastering the garlic‑Parmesan glaze that makes these bombs shine. By the end, you’ll wonder how you ever settled for ordinary appetizers when you could be serving up these little marvels at every gathering. Picture yourself pulling this out of the oven, the whole kitchen smelling incredible, and watching your guests’ eyes widen as they bite into the first golden‑brown bite. Let me walk you through every single step — by the end, you’ll wonder how you ever made it any other way.
What Makes This Version Stand Out
- Flavor Explosion: The garlic‑butter glaze infuses the roll with aromatic depth while the Parmesan creates a crisp, savory crown that shatters like thin ice under your teeth.
- Juicy Core: Ground beef seasoned with just the right amount of salt, pepper, and fresh garlic stays moist because it’s sealed inside the soft roll, preventing any drying out.
- Cheese Pull: Shredded cheddar melts into a gooey river that stretches with each bite, delivering that classic cheeseburger stretch you love.
- Simple Prep: With only eight core ingredients you can have a gourmet‑level snack on the table in under an hour—no fancy equipment required.
- Versatile Crowd‑Pleaser: Whether it’s a game night, a backyard BBQ, or a quick after‑school snack, these bombs win over kids, teens, and adults alike.
- Make‑Ahead Friendly: Assemble ahead of time, refrigerate, then bake when guests arrive. The flavor actually deepens after a short rest.
- Ingredient Quality: Using fresh garlic, real Parmesan, and high‑quality ground beef turns a humble snack into a culinary experience.
- Texture Harmony: The contrast between the buttery, slightly crisp exterior and the tender, juicy interior is what makes every bite unforgettable.
Inside the Ingredient List
The Flavor Base
Ground beef: The star of the show! It adds rich flavor and protein. You can substitute lean turkey or chicken if you’d like a healthier option. When you brown the beef, make sure you break it up into small crumbles so every bite gets an even distribution of meat. Skipping this step and using pre‑cooked beef will result in a dry, crumbly interior that lacks the juicy bite we’re after.
The Cheese Crew
Cheddar cheese: This melty goodness makes every bite a delight. Feel free to swap it with your favorite cheese, like mozzarella for a milder taste. Shredded cheese melts uniformly and creates those coveted cheese‑pull moments. If you use a pre‑shredded blend with anti‑caking agents, you might notice a slightly gritty texture, so fresh shredding is the way to go.
The Bread Bed
Soft dinner rolls: These create the perfect little vessels for your bombs. Look for fluffy options; Hawaiian rolls add a sweet twist! The roll’s softness absorbs the butter‑garlic mixture, turning the exterior into a golden crust while keeping the interior pillowy. If you can’t find soft rolls, a brioche bun sliced into thirds works just as well.
The Finishing Touches
Melted butter: This brings a golden‑brown hue and richness to the rolls. You can use olive oil for a lighter version, but butter gives that unmistakable buttery crunch we crave. Warm the butter just enough to melt—overheating will separate the milk solids and give a greasy finish.
Garlic: Freshly minced garlic lends a punch of flavor that pairs perfectly with the beef. Garlic powder works in a pinch, but fresh is always best! Mince the cloves finely so they distribute evenly throughout the butter glaze and don’t leave big bites of raw garlic.
Parmesan cheese: This cheesy topping adds a delightful savory finish. Consider using grated Pecorino Romano for a different flavor profile that’s a tad sharper and saltier. Sprinkle it generously after brushing the butter so it adheres and forms a crisp crust during baking.
Chopped fresh parsley: A pop of color and freshness that brightens the dish! If you’re out of fresh parsley, dried herbs like Italian seasoning can work in a pinch, but they won’t give the same burst of green freshness.
Salt and black pepper: Essential seasonings that enhance all the flavors. Adjust them to your taste preference—remember, the cheese already brings some saltiness, so start with a light hand and taste as you go.
Everything's prepped? Good. Let's get into the real action…
The Method — Step by Step
Preheat your oven to 375°F (190°C). While the oven warms, line a baking sheet with parchment paper. This temperature is perfect for achieving a golden crust without burning the garlic. The oven’s steady heat will also keep the beef moist inside the roll.
In a small saucepan, melt 3 tablespoons of butter over medium heat. Add the minced garlic and sauté for 30‑45 seconds until fragrant but not browned—watch out for that garlic turning bitter. Once aromatic, remove from heat and set aside; this is your garlic‑butter glaze that will coat every roll.
Take your soft dinner rolls and, using a sharp knife, cut a shallow pocket in the top third of each roll—think of it as creating a tiny dome. This pocket will hold the seasoned beef and cheese, preventing them from spilling out during baking. If the rolls are particularly soft, you can gently press them with a fork to create a small indentation.
In a large skillet, crumble the ground beef and season with ½ teaspoon salt, ¼ teaspoon black pepper, and a pinch of dried Italian herbs if you like. Cook over medium‑high heat, breaking the meat apart with a wooden spoon, until it’s browned and no longer pink—about 6‑8 minutes. Drain any excess fat to keep the bombs from getting greasy.
Transfer the cooked beef to a mixing bowl and fold in 1 cup shredded cheddar cheese, ¼ cup grated Parmesan, and the chopped fresh parsley. The heat from the beef will slightly melt the cheese, creating a cohesive mixture that sticks to the roll. Taste and adjust seasoning with a pinch more salt or pepper if needed.
Using the ice‑cream scoop (or a tablespoon), fill each roll’s pocket with the beef‑cheese mixture, pressing gently to compact it. Be careful not to over‑stuff; you want the roll to close around the filling without tearing. This step is the heart of the bomb—each bite should deliver a balanced ratio of meat, cheese, and roll.
Brush the tops of the filled rolls generously with the garlic‑butter glaze you prepared earlier. Then, sprinkle an additional 2 tablespoons of grated Parmesan over each roll. The Parmesan will form a crisp, aromatic crust as it bakes, giving you that satisfying crunch.
Slide the sheet into the preheated oven and bake for 15‑18 minutes, or until the tops are bubbling, the Parmesan is lightly browned, and the rolls have puffed up slightly. The moment you see the cheese start to melt and the aroma of garlic fill the kitchen, you’ll know you’ve hit the sweet spot.
Remove the bombs from the oven and let them rest for 3‑4 minutes. This brief rest allows the cheese to set just enough so the bombs don’t fall apart when you pick them up. Serve warm, and watch as your guests dive in with gleeful anticipation.
Insider Tricks for Flawless Results
The Temperature Rule Nobody Follows
Most home cooks set the oven to “high” hoping for a quick crust, but the magic lies in a moderate 375°F. This temperature lets the butter glaze caramelize without scorching the garlic, while the interior stays moist. If you crank it up to 425°F, the Parmesan will burn before the beef even heats through, ruining the texture.
Why Your Nose Knows Best
When the garlic‑butter starts to sizzle, you’ll hear a faint “pop” and smell a nutty, buttery aroma—that’s your cue that the glaze is ready to coat. Trust that sensory signal more than a timer; a few seconds too long and the butter will brown, turning bitter.
The 5‑Minute Rest That Changes Everything
After baking, let the bombs sit for exactly five minutes. This pause lets the cheese firm up just enough to hold its shape while the steam inside the roll redistributes, keeping the interior pillowy. Skipping this step often results in a messy, cheese‑dripping disaster.
Don’t Over‑Mix the Beef
When you combine the cooked beef with cheese and parsley, mix just until everything is evenly distributed. Over‑mixing can break down the meat fibers, making the filling gritty instead of tender. A gentle fold preserves the juicy texture.
Parmesan Placement Perfection
Apply the Parmesan after the butter glaze, not before. The butter acts as an adhesive, ensuring the cheese adheres and creates that crunchy crust. If you sprinkle Parmesan first, it will slide off during baking, leaving you with a bland top.
Creative Twists and Variations
This recipe is a playground. Here are some of my favorite ways to switch things up:
Spicy Jalapeño Bombs
Add finely diced jalapeños to the beef mixture and swap half the cheddar for pepper jack. The heat pairs beautifully with the buttery roll, making it perfect for those who love a little kick.
BBQ Bacon Bliss
Stir in a tablespoon of BBQ sauce and crumble cooked bacon into the meat before stuffing. The smoky, sweet flavor elevates the snack to a backyard BBQ staple.
Mediterranean Twist
Replace the cheddar with feta, add sun‑dried tomatoes, and sprinkle oregano over the top. The tangy feta and herbaceous notes turn the bombs into a Mediterranean appetizer.
Breakfast Bombs
Swap the beef for crumbled breakfast sausage, use shredded mozzarella, and top with a drizzle of maple‑syrup glaze after baking. These are perfect for brunch or a lazy weekend morning.
Vegan Delight
Use plant‑based ground “beef,” vegan cheddar, and dairy‑free butter. The same garlic‑Parmesan concept can be mimicked with nutritional yeast mixed into the glaze for a cheesy, umami finish.
Storing and Bringing It Back to Life
Fridge Storage
Place cooled bombs in an airtight container and store for up to 3 days. Reheat in a 350°F oven for 8‑10 minutes; the heat will revive the buttery crust without making the rolls soggy.
Freezer Friendly
Wrap each bomb individually in parchment paper, then seal them in a freezer bag. They’ll keep for up to 2 months. To bake from frozen, add an extra 5‑7 minutes to the baking time and cover loosely with foil for the first half to prevent over‑browning.
Best Reheating Method
Add a tiny splash (about a teaspoon) of water to the bottom of the baking sheet before reheating; the steam revitalizes the roll’s interior while the top stays crisp. This trick restores that fresh‑out‑of‑the‑oven texture you love.