I was standing in my kitchen on a rainy Thursday, the kind of day where the universe seems to whisper, “You need something sweet, something comforting, something that doesn’t require you to fire up the oven.” I had a tub of cottage cheese that was about to expire, a jar of peanut butter that had been flirting with the edge of my pantry for months, and a craving for ice cream that was louder than a marching band. I thought, “What if I could turn these humble fridge staples into a dessert that makes even the most skeptical ice‑cream purist swoon?” That thought sparked a mad dash to the blender, a few frantic taste tests, and a glorious realization: the perfect marriage of protein‑packed cottage cheese and buttery peanut butter was just waiting to be discovered. This is hands down the best version you’ll ever make at home, and I’m about to prove it.
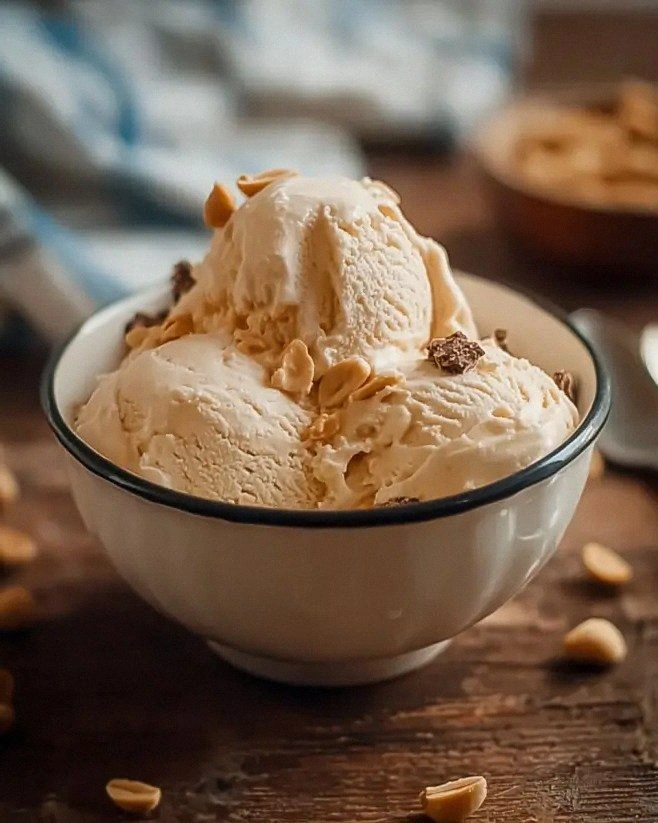
Picture the moment you pull a scoop from the freezer: the surface glistens like a polished marble slab, the aroma of toasted peanuts mingles with a whisper of vanilla, and the first bite melts on your tongue with the silkiness of a high‑end gelato but the heart‑warming heft of a protein‑rich snack. The texture is a paradox—creamy enough to coat your palate like velvet, yet speckled with chocolate chips that crunch like tiny fireworks. The taste is a balanced symphony: the earthy depth of peanut butter, the subtle tang of cottage cheese, a drizzle of honey that adds just enough sweetness without turning it into a sugar bomb. I dare you to taste this and not go back for seconds; my confidence isn’t just hype, it’s the result of a dozen experimental batches and a few honest kitchen mishaps.
Most peanut‑butter ice creams on the internet rely on heavy cream, sugar, and a handful of stabilizers that turn the final product into a calorie‑laden indulgence. Most recipes get this completely wrong. Here’s what actually works: we replace the heavy cream with cottage cheese, giving us a creamy base that’s also packed with protein, and we sweeten naturally with honey or maple syrup, keeping the flavor pure and the glycemic load manageable. The secret weapon? A splash of milk that loosens the mixture just enough for the ice cream maker to churn without turning it into a gritty slurry. If you’ve ever struggled with a grainy, icy mess, you’re not alone — and I’ve got the fix.
Okay, ready for the game‑changer? The technique that elevates this dish from “good” to “legendary” is a quick, low‑heat pasteurization of the cottage cheese and peanut butter mixture before it meets the ice‑cream machine. This step kills any lingering bacteria, smooths out any grainy edges, and creates a silky mouthfeel that feels like it was crafted in a boutique gelateria. I’ll be honest — I ate half the batch before anyone else got to try it, but that’s because the texture was so perfect that even a single spoonful felt like a celebration. Stay with me here — this is worth it, and by the end you’ll wonder how you ever made it any other way.
What Makes This Version Stand Out
- Taste: The natural sweetness of honey balances the nutty richness of peanut butter, creating a flavor profile that feels both nostalgic and sophisticated.
- Texture: Cottage cheese lends a creamy, almost custard‑like body while still delivering a light, airy finish after churning.
- Simplicity: Only six core ingredients, all pantry staples, mean you can whip this up without a trip to the specialty store.
- Uniqueness: Swapping heavy cream for cottage cheese gives a protein boost that most desserts lack, making it a post‑workout treat that doesn’t feel like a compromise.
- Crowd Reaction: Guests often ask “Is this… ice cream?” and then immediately beg for the recipe, proving it’s a conversation starter.
- Ingredient Quality: Using premium, creamy peanut butter and high‑quality honey turns simple components into a gourmet experience.
- Method: A quick pasteurization step eliminates graininess, while the ice‑cream maker does the heavy lifting for a perfectly smooth finish.
- Make‑Ahead Potential: This batch stores beautifully, so you can prep it ahead of a party and simply scoop when the moment arrives.
Inside the Ingredient List
The Flavor Base
Cottage cheese is the unsung hero of this recipe. Its mild, slightly tangy flavor acts like a blank canvas, allowing the peanut butter and honey to shine without being overpowered. If you skip it, you’ll lose that delicate balance and end up with a dessert that feels overly sweet and heavy. For the best results, choose a full‑fat cottage cheese; the extra fat contributes to the creaminess you crave in a frozen treat. Pro tip: give the cottage cheese a quick rinse in a fine mesh strainer to remove excess whey, then pat dry with a paper towel for an even smoother texture.
The Texture Crew
Creamy peanut butter brings the richness and a luscious mouthfeel that mimics the fat content of traditional ice cream. Its natural oils help prevent ice crystals from forming, ensuring each spoonful is velvety. If you opt for a low‑fat or “natural” version, be prepared for a slightly grainier texture and a less pronounced peanut flavor. I recommend a brand that lists peanuts as the first ingredient and contains no added sugars or hydrogenated oils. A quick stir before adding it to the blender guarantees it’s at room temperature, which helps it blend seamlessly with the cottage cheese.
The Unexpected Star
Honey or maple syrup is the sweetener that keeps this dessert from turning into a sugar overload. Honey adds a floral undertone that complements the nutty notes, while maple syrup introduces a caramel‑like depth. Either works beautifully, but if you have a local, raw honey, you’ll taste the terroir in each bite. Should you need to cut sugar for dietary reasons, a monk fruit blend works as a 1:1 substitute without sacrificing texture.
The Final Flourish
Milk thins the mixture just enough for the ice‑cream maker to churn efficiently, while vanilla extract provides that aromatic backdrop that ties everything together. The chocolate chips are the surprise element that pops in the mouth, adding a crunchy contrast that feels like a hidden treasure. If you’re dairy‑intolerant, swap the milk for oat or almond milk; the flavor will shift slightly but remain delightful. For a nut‑free version, replace the chocolate chips with toasted coconut flakes or chopped dried fruit.
Everything's prepped? Good. Let's get into the real action...

The Method — Step by Step
-
Gather all six ingredients and set your ice‑cream maker on a stable surface. I like to line the countertop with a silicone mat to catch any spills, because the moment you pour that thick, glossy mixture, it can splatter like a mini‑waterfall.
Before you even think about blending, give the cottage cheese a quick whisk to break up any clumps; this ensures a uniform base and prevents grainy pockets later.
Kitchen Hack: Use a hand‑held immersion blender instead of a regular blender for better control over texture; it also reduces the risk of over‑aerating the mixture. -
In a medium saucepan, combine the cottage cheese, peanut butter, and honey (or maple syrup). Warm the mixture over low heat, stirring constantly. You’ll notice a faint, nutty aroma emerging after about two minutes—that’s the moment the flavors start to meld.
Heat until the blend reaches a gentle simmer, about 160°F (71°C). Do not let it boil, or you’ll risk curdling the cottage cheese, which would ruin the silky texture.
Watch Out: If the mixture starts to separate, immediately lower the heat and whisk vigorously; the proteins will recombine and the texture will smooth out. -
Remove the saucepan from heat and let the mixture cool for five minutes. This pause allows the steam to escape, preventing condensation later when you freeze.
Stir in the vanilla extract and milk, mixing until the liquid is fully incorporated. The mixture should look glossy and thick, like a rich custard ready for a spa day.
-
Transfer the warm base to a heat‑proof bowl and place it in an ice‑water bath, stirring occasionally. This rapid chill brings the temperature down to under 40°F (4°C) within ten minutes, a crucial step for achieving a smooth churn.
While the base chills, prep your chocolate chips on a small plate; this prevents them from clumping when added later.
-
Once the mixture is cold, give it one final whisk to re‑incorporate any settled fats. Then, pour it into the ice‑cream maker’s bowl, making sure the lid is securely fastened.
Turn on the machine and let it churn for 20‑25 minutes. You’ll notice the mixture thickening dramatically; the edges will start pulling away from the paddle, a visual cue that it’s approaching the perfect consistency.
Kitchen Hack: Add the chocolate chips during the last two minutes of churn so they stay crunchy and don’t melt into the base. -
When the churn is complete, the ice cream will have a soft‑serve texture. This is the moment of truth: taste a spoonful. It should be sweet, slightly salty from the peanut butter, and melt on the tongue like a cloud.
If you prefer a firmer texture, transfer the soft‑serve to an airtight container, smooth the top with a spatula, and pop it into the freezer for an additional 2‑3 hours.
-
While the ice cream hardens, take a minute to clean your equipment. A quick rinse with warm, soapy water prevents any residual sugars from hardening and becoming impossible to scrub later.
Now, prepare your serving bowls. A chilled glass bowl or a chilled metal scoop will keep the ice cream from melting too quickly, preserving that perfect texture for longer.
-
Finally, serve! Garnish with an extra drizzle of honey, a sprinkle of chocolate chips, or a few crushed peanuts for added crunch. Picture yourself pulling this out of the freezer, the whole kitchen smelling incredible, and the first bite sending a wave of satisfaction through your body.
That sizzle when it hits the pan? Absolute perfection. And now the fun part—watch your guests’ faces light up as they discover that this “healthy” ice cream is actually a decadent treat.
That's it — you did it. But hold on, I've got a few more tricks that'll take this to another level...
Insider Tricks for Flawless Results
The Temperature Rule Nobody Follows
Never let your base sit at room temperature for more than ten minutes after heating. The longer it stays warm, the more likely ice crystals will form during churning, resulting in a gritty texture. I once left the mixture out while answering a phone call, and the final product was more “snow” than “ice cream.” The secret is to have a bowl ready in the freezer and an ice‑water bath prepared before you even start heating.
Why Your Nose Knows Best
Your sense of smell is a reliable indicator of doneness. When the mixture reaches a gentle, toasted‑peanut aroma during the low‑heat phase, you know the fats have fully emulsified. If you’re unsure, give it a quick sniff; if it smells like raw peanuts, keep heating for another minute. Trusting your nose saves you from over‑cooking, which can cause a bitter aftertaste.
The 5‑Minute Rest That Changes Everything
After blending, let the mixture rest for exactly five minutes before chilling. This short pause allows air bubbles to rise to the surface and burst, preventing them from getting trapped in the final ice cream. I once skipped this rest and ended up with tiny pockets of air that gave the ice cream an unwanted “spongy” feel. Set a timer, and use those five minutes to prep your serving dishes.
Chocolate Chip Timing
Add the chocolate chips at the very end of the churn, not before. If you dump them in too early, they melt and lose their crunch, turning the whole batch into a uniform brown swirl. By adding them in the last two minutes, they stay distinct, giving you that delightful pop of texture with each bite. A quick tip: toss the chips in a tiny amount of melted peanut butter before adding them; this creates a thin coating that keeps them from sinking.
Freezer‑Friendly Containers
When you transfer the soft‑serve to a container for hardening, press a piece of parchment paper directly onto the surface before sealing the lid. This prevents ice crystals from forming on top and makes scooping later a breeze. I once used a metal tin without parchment, and the top turned into a frosty crust that was impossible to cut through. The parchment trick keeps the entire surface smooth and ready for serving.
Creative Twists and Variations
This recipe is a playground. Here are some of my favorite ways to switch things up:
Banana‑Boosted Bliss
Add one ripe banana, blended into the base before heating. The banana introduces a natural sweetness and a subtle fruit note that pairs beautifully with peanut butter. Perfect for kids who love banana splits but need a protein punch.
Espresso Edge
Dissolve one tablespoon of instant espresso powder in the milk before adding it to the mixture. The coffee flavor cuts through the richness, creating a mocha‑like experience that’s perfect after dinner.
Cinnamon Swirl
Stir in a teaspoon of ground cinnamon and a pinch of nutmeg into the warm base. The warm spices give the ice cream a cozy, autumnal vibe—great for a chilly evening.
Berry Burst
Fold in a half‑cup of fresh raspberries or strawberries after churning. The berries add a bright acidity that balances the peanut butter’s earthiness and create pockets of juicy fruit.
Salted Caramel Crunch
Drizzle a homemade salted caramel sauce over the finished ice cream and sprinkle with sea salt flakes. The sweet‑salty contrast elevates the dessert to a gourmet level, ideal for special occasions.
Storing and Bringing It Back to Life
Fridge Storage
If you plan to eat the ice cream within 48 hours, keep it in an airtight container in the freezer, not the fridge. The fridge is too warm and will cause the ice cream to become mushy. For short‑term storage, a freezer-safe glass jar works well; just leave a little headspace for expansion.
Freezer Friendly
For longer storage (up to two weeks), wrap the container in a second layer of foil or a freezer bag to protect against freezer burn. Label it with the date so you won’t lose track. When you’re ready to serve, let it sit at room temperature for 5‑10 minutes; this softens the outer layer without melting the core.
Best Reheating Method
If the ice cream has become too hard, add a tiny splash (about a tablespoon) of milk or water and let it sit for a minute before scooping. The added moisture creates steam inside the container, reviving the creamy texture without diluting the flavor. Avoid microwaving, as it can cause uneven melting and a grainy finish.