I’ll be honest — I ate half the batch before anyone else got to try it, and that’s exactly why I’m shouting from the rooftops about this dessert. It all started on a rainy Thursday when my roommate dared me to turn a boring box of Oreos into something that would make a sushi chef weep with envy. I was half‑asleep, half‑confused, and fully convinced that “no‑bake” meant “no‑fun.” The kitchen smelled like a combination of fresh coffee and a childhood birthday cake, the kind of aroma that makes you forget you’re an adult for a few glorious seconds. When the first roll came out of the fridge, it looked like a piece of modern art—crisp chocolate edges, creamy white interior, and a swirl of crushed Oreos that reminded me of a marble countertop. I dared you to taste this and not go back for seconds.
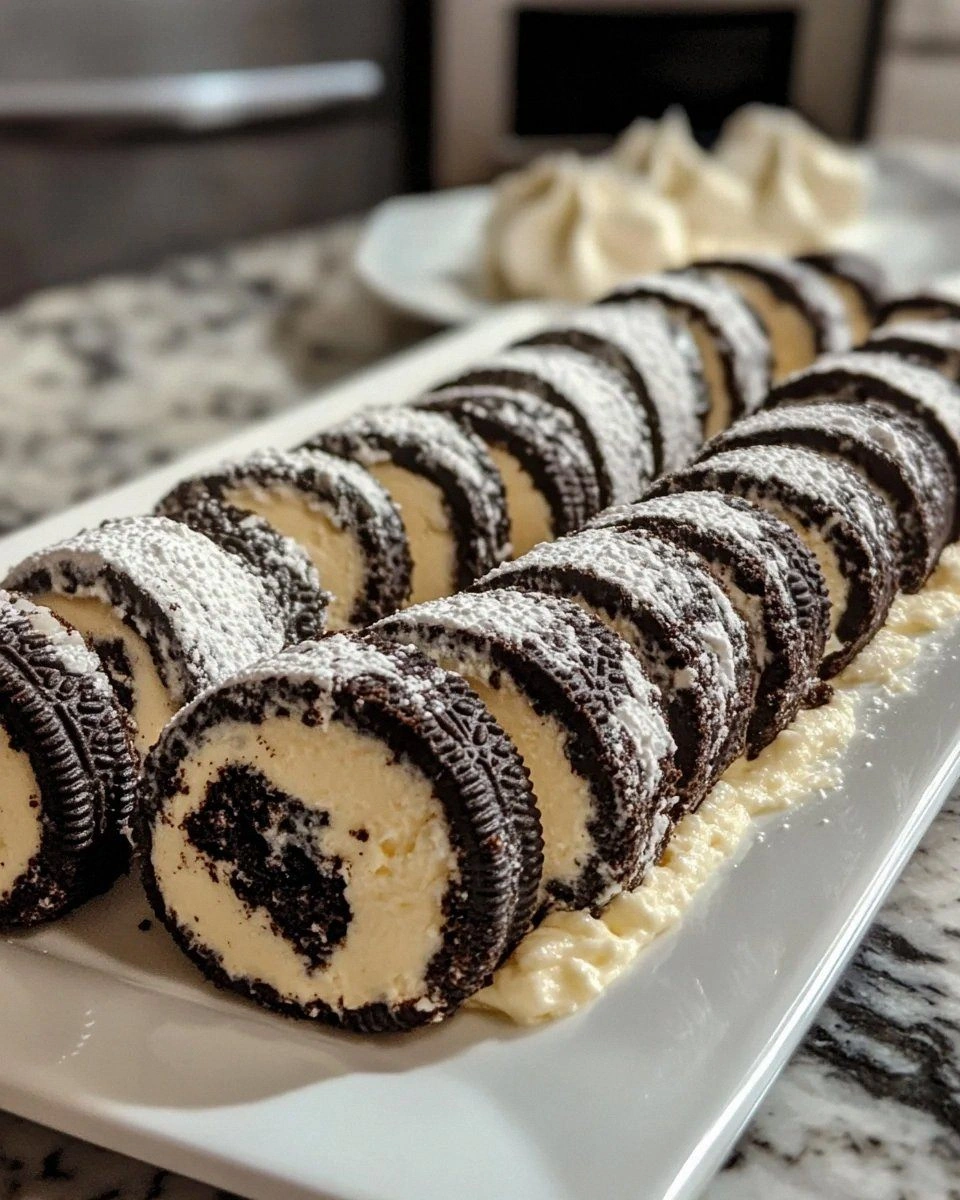
Picture yourself in a tiny apartment kitchen, the rain pattering against the window, the hum of the fridge as your only soundtrack. You’re holding a tray of these sushi‑style rolls, each one a perfect cylinder of cheesecake goodness wrapped in a crunchy Oreo crust, glistening with a glossy chocolate drizzle. The first bite is a symphony: the crust shatters like thin ice, the filling is as smooth as satin, and the chocolate drizzle adds a bittersweet whisper that lingers just long enough to make you sigh. Most recipes get this completely wrong — they either over‑mix the filling, turning it grainy, or they forget the crucial step of chilling long enough for the rolls to hold together. Here’s what actually works: a quick chill, a gentle fold, and a secret ingredient that turns the whole thing from “good” to “hands down the best version you’ll ever make at home.”
What makes this version truly special is the balance of textures and flavors, but also the sheer simplicity. You won’t need an oven, a stand mixer, or a culinary degree. All you need is a food processor, a few bowls, and the willingness to get a little messy (the mess is part of the fun, trust me). I’ve thrown in a tiny splash of vanilla that lifts the whole thing like a spotlight on a stage, and a dash of sea salt that makes the chocolate pop like fireworks on the Fourth of July. The secret? A quick flash‑freeze that gives the rolls a firm bite without turning them into an icy block. This next part? Pure magic.
Let me walk you through every single step — by the end, you’ll wonder how you ever made it any other way. I’m going to spill the beans on the exact technique that keeps the rolls from falling apart, the best way to crush Oreos without turning them into dust, and the perfect drizzle pattern that will make your guests gasp. Stay with me here — this is worth it. Okay, ready for the game‑changer?
What Makes This Version Stand Out
- Texture: A triple‑layer experience – crunchy Oreo crust, velvety cheesecake interior, and a glossy chocolate glaze that snaps like a fresh spring twig.
- Flavor: The deep cocoa of the Oreos is balanced by a light, tangy cream cheese filling, while a whisper of vanilla and sea salt adds depth.
- Simplicity: No oven, no fancy equipment – just a food processor, a rolling mat, and a fridge.
- Visual Impact: The sushi‑roll shape lets you slice perfect bite‑size pieces that look as good as they taste, making it an instant show‑stopper.
- Make‑Ahead Potential: These rolls keep beautifully for up to three days, so you can prep ahead for parties or a lazy weekend treat.
- Ingredient Quality: Using premium Oreos and full‑fat cream cheese gives a richness that cheap alternatives simply can’t match.
- Cooking Method: The no‑bake approach preserves the delicate crunch of the Oreo crumbs, which would otherwise melt in a traditional bake.
- Crowd Reaction: First‑time tasters often claim they’ve never seen a dessert that looks like sushi and tastes like a childhood dream.
Inside the Ingredient List
The Crunchy Base
The foundation of these rolls is a simple Oreo crust. Twenty‑four Oreo cookies, crushed into fine crumbs, provide a chocolatey backbone that’s both buttery and crisp. I recommend using the original chocolate‑filled Oreos because the cream filling adds an extra layer of richness that plain chocolate wafers lack. If you skip the butter, the crust will crumble like dry sand and won’t hold together when you roll it. A quick tip: melt two tablespoons of unsalted butter and drizzle it over the crumbs before pressing the mixture onto the parchment – it acts like edible glue, binding the crumbs into a solid sheet.
The Creamy Center
The heart of the roll is a no‑bake cheesecake filling made from eight ounces of full‑fat cream cheese, softened to room temperature. This ensures a smooth, lump‑free mixture that folds easily with the other ingredients. I add half a cup of powdered sugar for sweetness and a teaspoon of pure vanilla extract for aromatic depth. The secret weapon is a cup of heavy whipping cream, lightly whipped to soft peaks; it lightens the filling without making it airy, giving that melt‑in‑your‑mouth feeling. Skipping the cream or over‑whipping will either make the filling too dense or too airy, causing the rolls to collapse during chilling.
The Silky Drizzle
A glossy chocolate glaze ties everything together. I melt half a cup of white chocolate (or milk chocolate if you prefer a deeper hue) with a splash of heavy cream for a glossy sheen that sets like a mirror. Adding a pinch of sea salt to the glaze amplifies the chocolate’s bitterness, creating a perfect sweet‑salty contrast. If you’re allergic to dairy, swap the cream for coconut milk, but expect a subtle coconut undertone. The glaze should be warm enough to coat the rolls smoothly but not so hot that it melts the interior.
The Final Flourish
Optional toppings can turn this dessert from impressive to unforgettable. A sprinkle of crushed Oreo crumbs on top adds visual texture, while a drizzle of dark chocolate creates a marbled effect. For a festive touch, consider edible gold leaf or a dusting of powdered sugar shaped like tiny snowflakes. These finishing touches don’t just look pretty; they add a tiny crunch that contrasts with the creamy core. Remember, a little goes a long way – you want the garnish to enhance, not overwhelm.
Everything's prepped? Good. Let’s get into the real action…
The Method — Step by Step
Start by crushing the Oreos. Place the cookies in a food processor and pulse until you have coarse crumbs, then switch to a gentle swirl to achieve a slightly finer texture. The goal is a crumb that looks like a chocolate sandstorm, not a fine powder. Once crushed, transfer the crumbs to a large bowl, melt two tablespoons of butter, and pour it over the crumbs. Mix with a spatula until the mixture holds together when pressed between your fingers.
Kitchen Hack: If you don’t have a processor, place the Oreos in a zip‑top bag and smash them with a rolling pin. Then sift the crumbs through a fine mesh to remove oversized pieces.Press the crumb‑butter mixture onto a sheet of parchment paper, forming a rectangle about 1/4‑inch thick. Use the back of a flat measuring cup to smooth it out, ensuring an even surface. This will become the “nori” of your sushi roll, so keep it flat and uniform. Once pressed, place the parchment with the crust in the freezer for exactly 10 minutes – this quick chill firms the base without drying it out.
While the crust chills, prepare the cheesecake filling. In a mixing bowl, beat the softened cream cheese until silky, about 2 minutes on medium speed. Add powdered sugar and vanilla, then continue beating until fully incorporated. In a separate bowl, whip the heavy cream to soft peaks – you want it to hold shape but still be pliable. Gently fold the whipped cream into the cream cheese mixture, using a spatula and a gentle lifting motion to keep the air trapped.
Watch Out: Over‑mixing the filling will cause it to become too runny, making the rolls difficult to shape. Stop as soon as the mixture is smooth and glossy.Remove the crust from the freezer. Lay a clean sheet of parchment over a bamboo sushi mat (or a clean kitchen towel if you don’t have a mat). Transfer the chilled crust onto the parchment, keeping it as flat as possible. If the crust cracks, gently press the cracks together with the back of a spoon – the chill will keep it from breaking further.
Spread the cheesecake filling evenly over the Oreo crust, leaving a ½‑inch border at the top edge (just like you’d leave a margin when rolling sushi). Use an offset spatula for a smooth layer; the filling should be about ¼‑inch thick. The border ensures the roll stays sealed once you start rolling.
Now for the fun part: rolling. Using the sushi mat, gently lift the edge of the parchment closest to you and start rolling forward, applying light pressure to keep the roll tight but not squashed. As you roll, the parchment will help guide the shape and keep the roll uniform. When you reach the end, give the roll a final gentle press to seal the edge. If the roll feels loose, chill it for another 5 minutes before proceeding.
Prepare the chocolate glaze. In a microwave‑safe bowl, combine half a cup of white chocolate chips with a tablespoon of heavy cream. Microwave in 20‑second bursts, stirring between each, until smooth and glossy. Add a pinch of sea salt, then stir again. The glaze should be warm but not hot – you want it to coat the rolls without melting the interior.
Using a sharp knife dipped in hot water (this prevents sticking), slice the roll into 1‑inch thick rounds. Place the slices back onto a parchment sheet, spacing them a little apart. Drizzle the warm chocolate glaze over each slice, allowing it to pool slightly at the edges for that dramatic sushi‑roll look. If you want a marbled effect, use a toothpick to swirl the glaze gently.
Kitchen Hack: To achieve perfectly even slices, chill the rolled log for 15 minutes before cutting. The firm texture makes the knife glide smoothly.Finally, let the rolls set in the fridge for at least 30 minutes. This final chill lets the chocolate glaze harden just enough to give a satisfying snap when you bite into it. While you wait, you can dust the top with a light scattering of crushed Oreo crumbs for extra crunch and visual flair. Once set, serve the rolls on a chilled platter, and watch your guests’ eyes widen as they realize they’re eating sushi that’s actually dessert.
That’s it — you did it. But hold on, I’ve got a few more tricks that’ll take this to another level. Trust me, these insider tips will make your next batch even more flawless, and they’ll save you from the common pitfalls that turn a masterpiece into a mess.
Insider Tricks for Flawless Results
The Temperature Rule Nobody Follows
Never underestimate the power of a cold environment. The crust firms up in the freezer, the filling sets in the fridge, and the glaze hardens only after a brief chill. If you skip any of these cooling steps, the roll will either fall apart or become a gummy mess. I once tried to skip the 10‑minute freezer step for the crust, and the result was a soggy sheet that ripped the moment I tried to roll it. The rule of thumb: keep everything below 40°F until you’re ready to assemble.
Why Your Nose Knows Best
Your sense of smell is a reliable indicator of doneness, especially for the chocolate glaze. When the glaze is warm, you’ll catch a faint buttery aroma; when it’s too hot, you’ll smell a burnt note. The moment the chocolate smells sweet and milky, you’re at the perfect temperature for drizzling. Trust that nose over the timer – it’s a sensory shortcut that even seasoned chefs swear by.
The 5‑Minute Rest That Changes Everything
After you’ve sliced the rolls, give them a quick 5‑minute rest on the counter before the final chill. This brief pause lets the internal steam redistribute, preventing the glaze from sliding off the sides. I’ve seen novices rush straight to the fridge and end up with a glaze that slides off like melted butter on a hot pan. Patience at this stage is the difference between a glossy finish and a sloppy one.
The “Double‑Fold” Technique for Tight Rolls
If you want a roll that holds together like a perfectly rolled sushi maki, give it a double‑fold. After the first roll, let it rest for 2 minutes, then gently roll it over once more using the mat. This extra tension tightens the layers without crushing the delicate filling. My friend tried this once and called it “the sushi roll that could survive a tumble in a backpack.”
The Secret of the “Cream Cheese Softening”
Softening cream cheese at room temperature for exactly 20 minutes is crucial. Too cold and it creates lumps; too warm and it becomes runny. If you’re in a hurry, cut the block into small cubes and let them sit uncovered; the increased surface area speeds up the softening process. A quick tip: microwave the cubes for 5 seconds each – just enough to loosen them without melting.
Creative Twists and Variations
This recipe is a playground. Here are some of my favorite ways to switch things up:
Matcha‑Infused Cream Cheese
Add two teaspoons of culinary‑grade matcha powder to the cream cheese filling. The earthy green hue contrasts beautifully with the dark chocolate glaze, and the subtle bitterness balances the sweet Oreo crust. Perfect for a spring tea party or a chic Instagram post.
Nutty Crunch Variation
Stir in a quarter cup of finely chopped toasted almonds or hazelnuts into the crust before pressing. The nutty aroma adds depth, and the extra crunch makes each bite feel like a surprise party in your mouth. Pair with a drizzle of caramel for a sophisticated twist.
Berry Burst Center
Fold a half‑cup of fresh raspberry puree into the cheesecake filling. The tartness of the berries cuts through the richness, creating a flavor explosion reminiscent of a summer dessert bar. Top with a light dusting of freeze‑dried raspberry powder for a pop of color.
Vegan Delight
Swap the cream cheese for a vegan cream cheese alternative, use coconut cream instead of heavy cream, and replace white chocolate with a dairy‑free chocolate coating. The texture remains indulgent, and the flavor stays true to the original concept. Just remember to chill a bit longer to allow the vegan ingredients to set properly.
Espresso‑Kick Glaze
Dissolve a tablespoon of instant espresso powder into the chocolate glaze. The coffee notes add a sophisticated bitterness that pairs wonderfully with the sweet Oreo base. It’s a perfect after‑dinner treat for coffee lovers who want a dessert that doesn’t overwhelm the palate.
Mini Bite‑Size Sushi
Instead of full‑size rolls, shape the crust and filling into bite‑size cylinders, about 2 inches long. These mini versions are ideal for cocktail parties where guests prefer a single, elegant bite. Serve them on a decorative platter with a side of whipped ganache for extra decadence.
Storing and Bringing It Back to Life
Fridge Storage
Cover the finished rolls tightly with plastic wrap or store them in an airtight container. They stay fresh for up to three days, retaining their texture and flavor. If you notice the glaze becoming a bit sticky, simply let the rolls sit uncovered for 10 minutes before serving.
Freezer Friendly
These rolls freeze like a dream. Wrap each roll individually in parchment, then place them in a zip‑top freezer bag. They can be frozen for up to a month. When you’re ready to enjoy them, transfer to the fridge for 2 hours, then let them sit at room temperature for 10 minutes before serving.
Best Reheating Method
If the chocolate glaze has hardened too much after refrigeration, add a tiny splash (about a teaspoon) of warm water to the glaze and gently microwave for 5 seconds. Stir, then drizzle again. This steam‑infused trick revives the glossy finish without melting the interior, giving you that fresh‑out‑of‑the‑fridge look every single time.