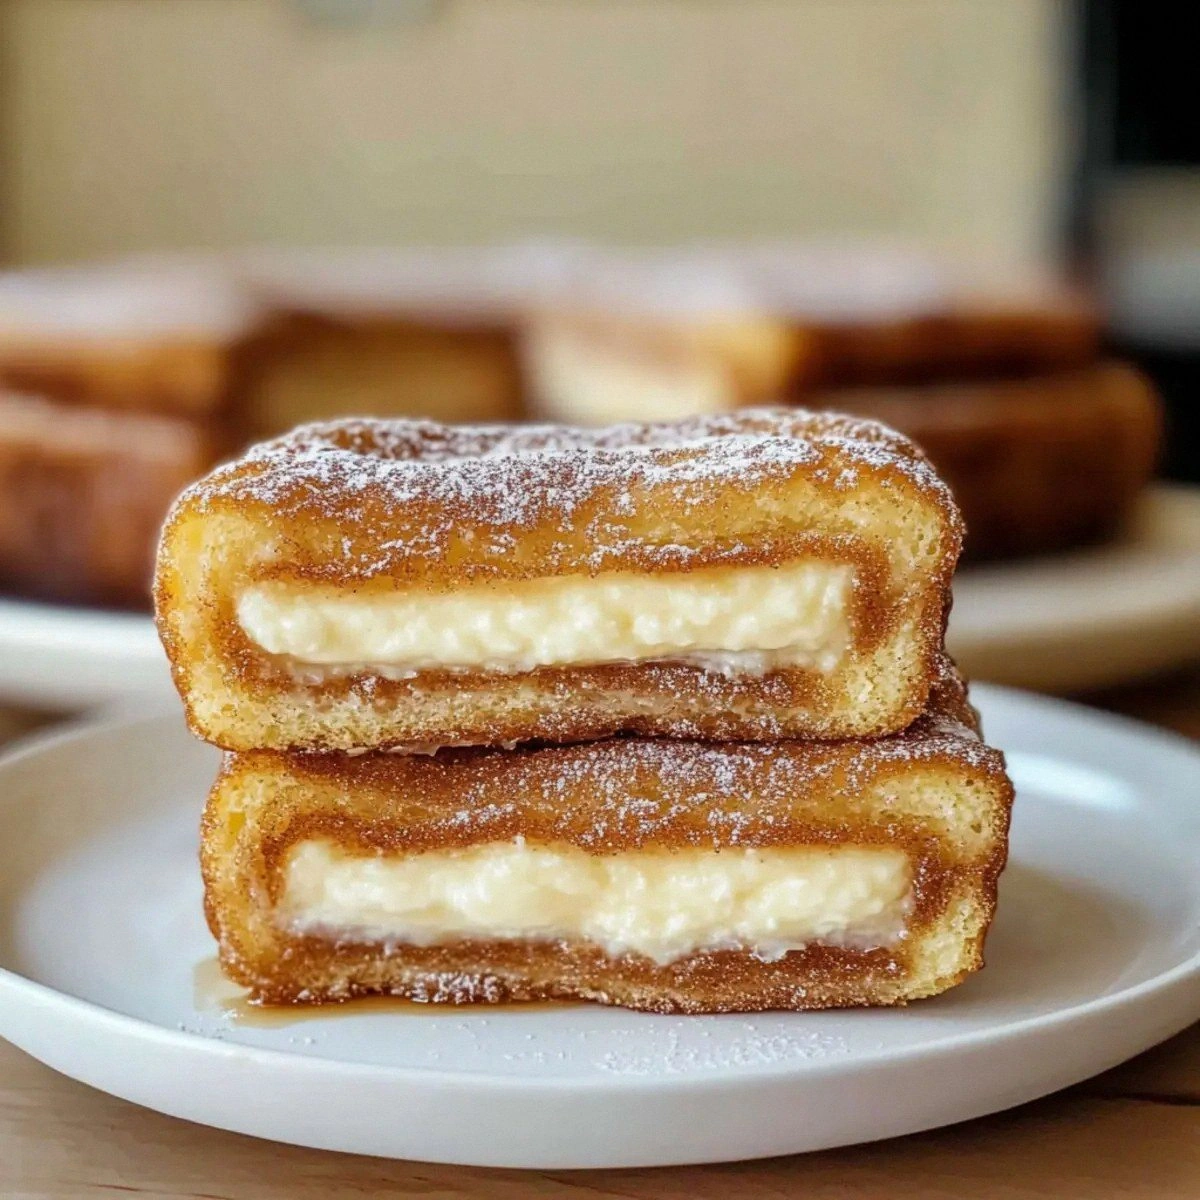
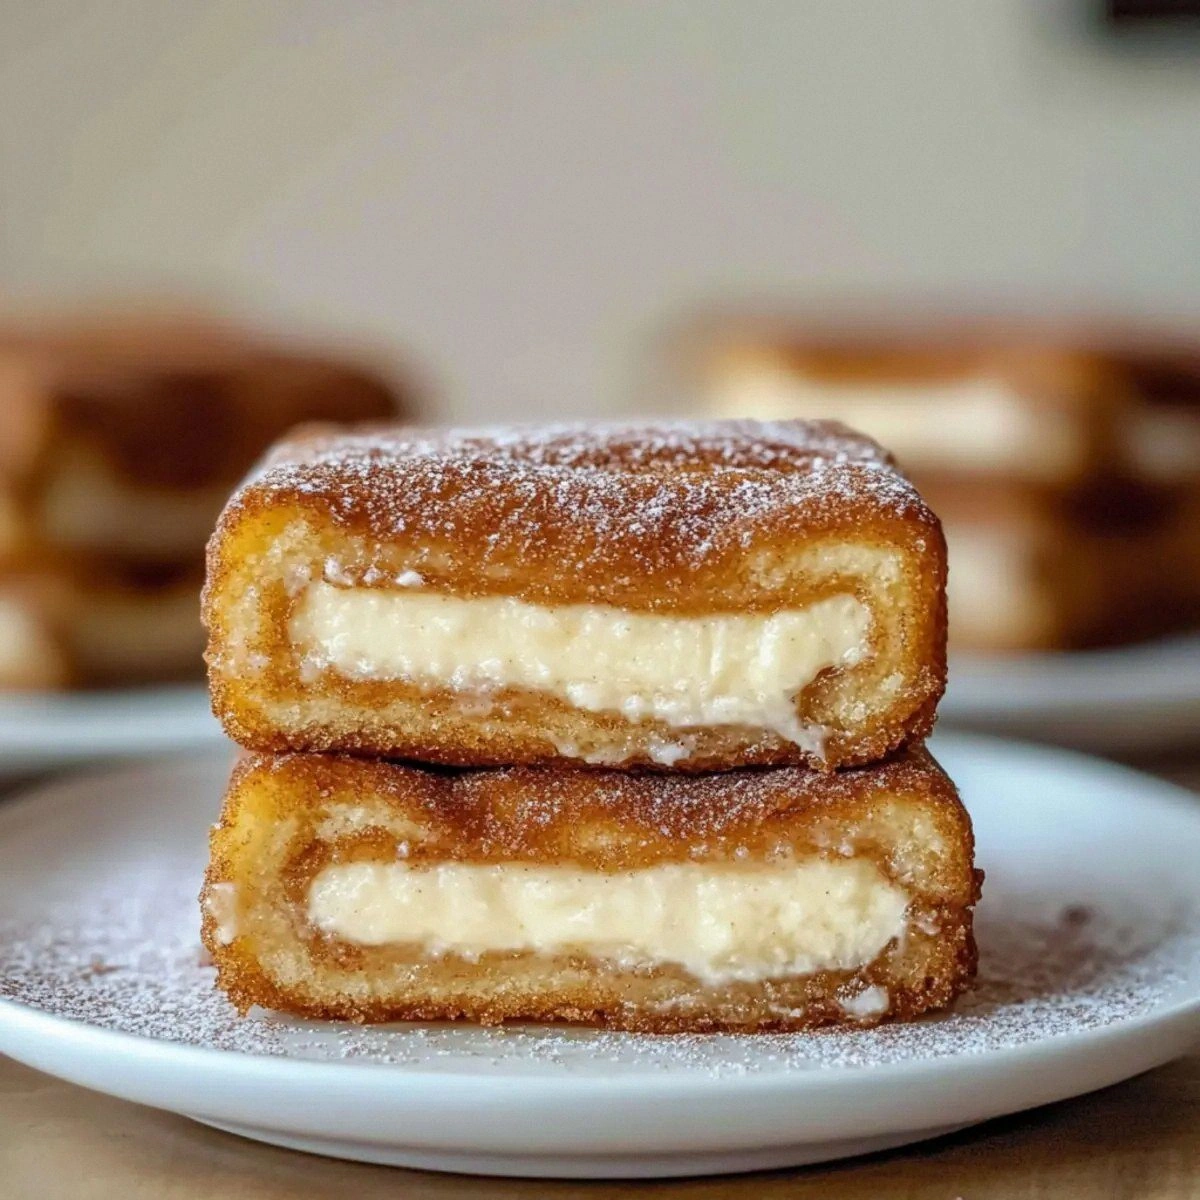
Picture this: a rainy Saturday afternoon, the kind where you’re stuck inside, scrolling through endless recipe blogs, and a sudden craving for something that feels like a carnival in your mouth hits you like a bolt of sugar‑charged lightning. I was mid‑scroll when my friend dared me to create a dessert that could out‑shine the classic churro and still keep the sophisticated allure of a cheesecake. Spoiler alert: I accepted, and the kitchen became a battlefield of butter, cinnamon, and that unmistakable aroma of fresh‑baked dough. The first attempt was a disaster—think soggy crust and a filling that tasted like plain cream cheese left out on the counter. But that failure sparked a fire, and I was determined to crack the code.
Fast forward a few weeks of trial, error, and a lot of tasting (I’ll be honest — I ate half the batch before anyone else got to try it), and I finally landed on a version that marries the crunchy, cinnamon‑kissed exterior of a churro with the silky, melt‑in‑your‑mouth decadence of a classic cheesecake. Imagine biting into a golden, flaky crust that shatters like thin ice, only to reveal a creamy, tangy center that coats your palate like velvet. The contrast is so dramatic that even the most seasoned dessert snob will gasp, “This is hands down the best version you’ll ever make at home.” I dare you to taste this and not go back for seconds.
The secret? It’s all in the layers. I’m using a tube of refrigerated crescent roll dough—not the usual graham cracker base—because it gives that buttery crunch we associate with churros while staying sturdy enough to hold the luscious filling. Then I fold in a double dose of cinnamon, split between the crust and a sugar‑cinnamon topping that caramelizes perfectly in the oven. And the finishing touch? A drizzle of cinnamon‑sugar butter that glistens like a caramel sunrise. Most recipes get this completely wrong. Here’s what actually works: a buttery crust, a perfectly set cheesecake, and a cinnamon topping that doesn’t burn.
Now, brace yourself for a technique that will make you feel like a pastry wizard. I’m going to press the crescent dough into the pan, bake it partially before adding the filling, and then finish it off with a high‑heat blast to achieve that coveted crunch. This step is pure magic and will give you that restaurant‑level texture without any fancy equipment. Let me walk you through every single step — by the end, you’ll wonder how you ever made it any other way.
What Makes This Version Stand Out
- Flavor Explosion: The double‑layered cinnamon creates a spice‑forward profile that’s both comforting and exhilarating, turning every bite into a mini celebration.
- Texture Contrast: A crisp, buttery crust meets a silky, tangy cheesecake interior, delivering a mouthfeel that’s simultaneously crunchy and creamy.
- Simplicity Meets Sophistication: Using store‑bought crescent dough cuts prep time in half while still delivering that artisanal crunch you crave.
- Visual Wow Factor: The golden‑brown crust speckled with cinnamon sugar looks like a work of art, making it perfect for Instagram‑ready moments.
- Crowd‑Pleaser: Whether it’s a family gathering or a fancy dinner party, this dessert consistently earns rave reviews and empty plates.
- Ingredient Quality: Fresh cream cheese and real cinnamon ensure the flavors shine without any artificial aftertaste.
- Make‑Ahead Friendly: You can bake the crust a day ahead, store the filling chilled, and assemble just before serving for zero stress.
- Versatile Base: The crescent roll dough can be swapped for puff pastry for an even lighter crunch, giving you room to experiment.
Inside the Ingredient List
The Flavor Base
The heart of this dessert is the cream cheese filling. Sixteen ounces of full‑fat cream cheese provides the richness and tang that balances the sweet, buttery crust. If you skimp on the quality, the filling will taste bland and watery—nothing kills a cheesecake faster than cheap cheese. I recommend using a block of cream cheese and letting it soften at room temperature for an hour; this ensures a smooth, lump‑free batter. As a swap, you can blend half cream cheese with Greek yogurt for a slightly lighter texture, but expect a tangier finish.
The Texture Crew
The crescent roll dough is the unsung hero here. One tube is all you need, and it brings a flaky, buttery crunch that mimics the classic churro exterior. If you’re allergic to wheat, you can substitute a gluten‑free puff pastry, though the texture will be a touch softer. Butter is melted and mixed with cinnamon and sugar to create a glaze that caramelizes during the final bake, giving the top a glossy, crackly finish. Skipping the butter glaze will leave the crust dry and less aromatic, so don’t cut corners.
The Unexpected Star
Cinnamon isn’t just a flavor; it’s the aromatic bridge between the crust and the filling. We use a teaspoon in the filling and another tablespoon in the topping, creating layers of spice that build as the cheesecake bakes. If you love heat, a pinch of cayenne can add a subtle kick without overwhelming the sweet profile. Remember, fresh ground cinnamon releases more essential oils than pre‑ground, so grind it fresh for maximum punch.
The Final Flourish
Granulated sugar appears twice: half a cup in the filling and a quarter cup in the topping. The first sweetens the cheesecake, while the second, combined with cinnamon, forms the caramelized crust that snaps under your fork. Using brown sugar instead of white will add a deeper molasses note, but it can darken the topping more than desired. For the best result, sift the sugar with the cinnamon to avoid clumps that could burn.
Everything's prepped? Good. Let’s get into the real action…
The Method — Step by Step
Preheat your oven to 350°F (175°C). While the oven warms up, unroll the tube of refrigerated crescent roll dough onto a lightly floured surface. Press the dough gently into a 9‑inch springform pan, making sure it reaches the corners and forms a slight lip around the edge. This lip will become the crunchy “churro” edge that shatters like thin ice when you bite into it. Once the crust is in place, set it aside while you prep the filling.
In a large mixing bowl, combine the softened cream cheese and half‑cup granulated sugar. Beat with an electric mixer on medium speed until the mixture is smooth, creamy, and free of lumps—think cloud‑like consistency. Add the two large eggs, one at a time, beating just until incorporated; over‑mixing can incorporate too much air, leading to cracks during baking. Then stir in the vanilla extract, a teaspoon of cinnamon, and the remaining quarter‑cup sugar. The batter should be glossy and thick, ready to pour over the crust.
Kitchen Hack: Add a splash of heavy cream (about 2 tbsp) to the batter if it looks too thick; this yields a silkier texture without making it runny.Pour the cheesecake batter over the prepared crust, smoothing the top with a spatula. Tap the pan gently on the counter three times to release any trapped air bubbles—those bubbles are the enemy of a smooth surface. Place the springform pan on a baking sheet (this catches any overflow) and slide it into the oven. Bake for 20 minutes, then lower the temperature to 325°F (163°C) and continue baking for another 15‑20 minutes, or until the center is just set with a slight wobble.
While the cheesecake bakes, melt the unsalted butter in a small saucepan over low heat. Once melted, stir in a tablespoon of cinnamon and the quarter‑cup of granulated sugar, whisking until the mixture forms a glossy paste. This butter‑cinnamon glaze is the secret to that caramelized, churro‑like crust. Keep the heat low to avoid burning the sugar; you want a gentle sizzle, not a frantic pop.
When the cheesecake is done, remove it from the oven and immediately brush the warm butter‑cinnamon glaze over the entire surface, making sure to coat the edges where the crust meets the filling. The heat will cause the glaze to melt into the crust, creating that signature crackly top. Let the cheesecake cool on a wire rack for 15 minutes, then run a thin knife around the edge to loosen it from the pan.
Now comes the crucial “crunch” step: increase the oven temperature to 425°F (220°C) and return the cheesecake for a quick 5‑minute blast. This high‑heat surge caramelizes the glaze, turning it a deep amber and giving the crust that irresistible snap. Keep a close eye on it; you want a golden hue, not a burnt disaster.
Watch Out: If you leave the cheesecake in the high‑heat too long, the topping will become bitter. Pull it out the moment you see a caramelized edge.After the final bake, let the cheesecake rest in the turned‑off oven with the door slightly ajar for 10 minutes. This gentle cooling helps prevent a sudden temperature drop that could cause cracks. Then transfer the pan to the refrigerator and chill for at least 2 hours, preferably overnight, so the flavors meld and the crust fully sets.
When you’re ready to serve, remove the springform ring, slice with a hot, wet knife (the heat helps achieve clean cuts), and watch the crust crack delightfully under the knife. Dust each slice with a light sprinkle of cinnamon sugar for an extra pop of flavor and visual appeal. Serve warm or at room temperature—either way, the contrast of textures will make your guests gasp in delight.
That’s it — you did it. But hold on, I’ve got a few more tricks that’ll take this to another level…
Insider Tricks for Flawless Results
The Temperature Rule Nobody Follows
Never bake a cheesecake straight from the fridge. Let the batter sit at room temperature for at least 30 minutes before pouring it over the crust. This prevents the crust from shocking and cracking, and it ensures the filling sets evenly. I once tried skipping this step; the result was a lopsided, cracked top that looked like a bad hair day. Trust me, this tiny pause makes a world of difference.
Why Your Nose Knows Best
Don’t rely solely on a timer. The moment you smell a faint caramel aroma wafting from the top, you know the crust is about to reach that perfect crunch. If you’re a visual person, look for the edges to pull slightly away from the pan—this is the “pull-away” sign that the cheesecake is set. Trust your senses; they’re more reliable than any clock.
The 5‑Minute Rest That Changes Everything
After the high‑heat blast, let the cheesecake sit in the turned‑off oven for five minutes with the door cracked. This short rest lets the residual heat finish the bake without over‑cooking the delicate filling. Skipping this rest will leave the center a touch under‑set, making it wobble when you cut into it.
Butter Brush Technique
When applying the butter‑cinnamon glaze, use a silicone pastry brush and work in a circular motion, starting from the center and moving outward. This ensures an even coat and prevents pooling at the edges, which can cause uneven caramelization. A friend tried dabbing the glaze with a spoon once; the result was a lopsided, greasy top. Brush, don’t dab.
Freezer‑Friendly Prep
If you’re planning ahead, you can bake the crust and store it in an airtight container for up to three days. The filling can be mixed, covered, and refrigerated for 24 hours before assembly. When you’re ready, simply combine, glaze, and give it the final high‑heat blast. This two‑day plan is perfect for busy hosts who still want that fresh‑baked wow factor.
Creative Twists and Variations
This recipe is a playground. Here are some of my favorite ways to switch things up:
Chocolate Churro Cheesecake
Swap half of the cream cheese with a chocolate ganache and add a teaspoon of cocoa powder to the crust glaze. The result is a rich, mocha‑infused delight that still retains the signature crunch. Chocolate lovers will swear it’s the best of both worlds.
Apple‑Cinnamon Swirl
Fold in a cup of finely diced, caramelized apples into the batter and sprinkle extra cinnamon sugar on top. The apples add a juicy burst that balances the buttery crust, making it perfect for autumn gatherings.
Nutty Crunch Variation
Mix chopped toasted pecans or almonds into the butter‑cinnamon glaze. The nuts add an extra layer of texture and a nutty depth that elevates the overall flavor profile. Just be careful not to over‑load; a handful is enough.
Vegan Adaptation
Replace the cream cheese with a vegan cream cheese alternative and use a plant‑based butter for the glaze. Use a vegan crescent roll dough (available in many grocery stores) to keep the crust flaky. The taste is slightly different but still undeniably delicious.
Spicy Churro Kick
Incorporate a pinch of cayenne pepper into the cinnamon glaze for a subtle heat that surprises the palate. This version is perfect for those who love a sweet‑spicy combo, and it pairs wonderfully with a cold glass of milk.
Storing and Bringing It Back to Life
Fridge Storage
Cover the cheesecake loosely with plastic wrap or a silicone lid and store it in the refrigerator for up to four days. The crust will stay crisp for the first two days; after that, it may soften slightly, but reheating will revive it.
Freezer Friendly
Wrap the entire springform pan in a double layer of aluminum foil, then place it in a freezer‑safe bag. Freeze for up to two months. When you’re ready to enjoy, thaw overnight in the fridge, then give it a quick 5‑minute bake at 350°F to restore the crunch.
Best Reheating Method
Preheat your oven to 300°F (150°C). Add a tiny splash (about a tablespoon) of water to the bottom of the pan, cover loosely with foil, and heat for 10‑12 minutes. The steam generated revitalizes the crust, making it snap again, while the interior stays creamy.